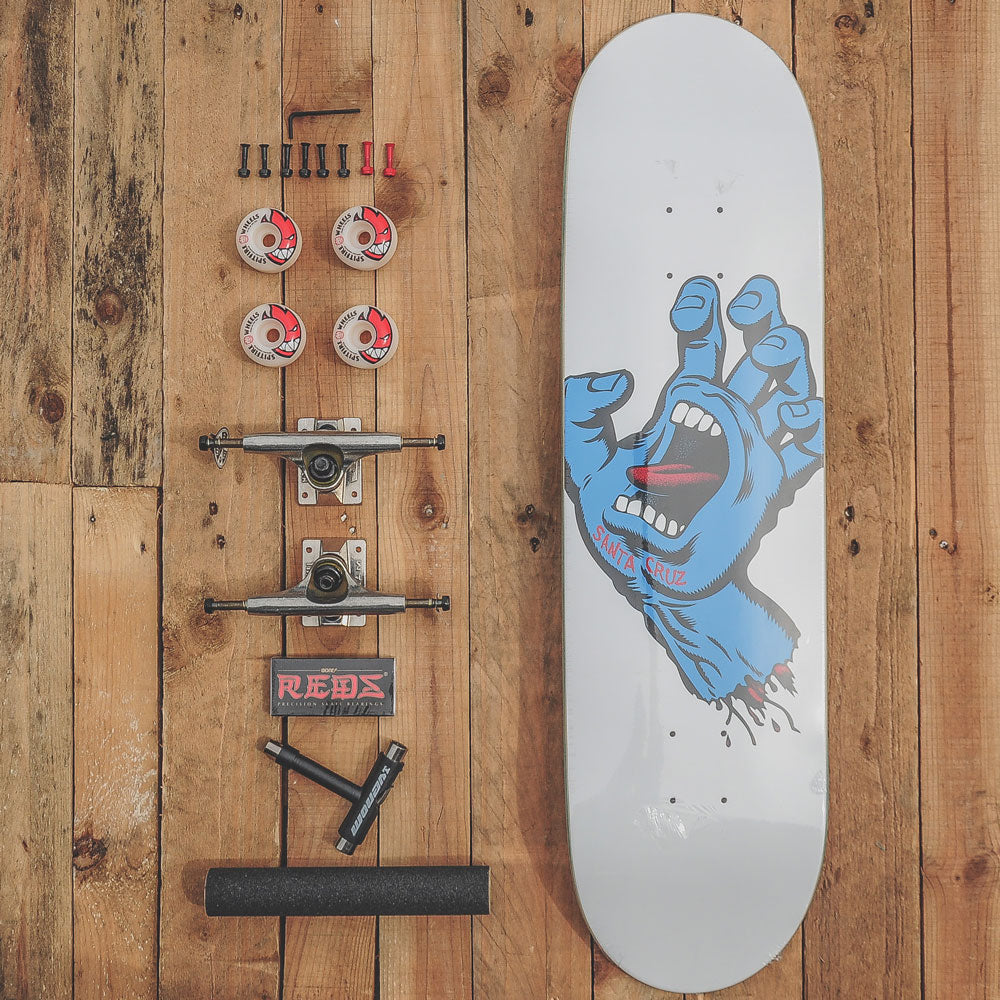
To assemble a skateboard in six easy steps, attach trucks, bearings, wheels, and grip tape to the deck, then tighten all bolts securely. Now, let’s dive into the details of each step and assemble your skateboard like a pro.
Skateboarding is a fun and exciting sport that requires the right equipment, including a well-assembled skateboard. Whether you’re a beginner or an experienced rider, knowing how to assemble your board properly is crucial for a safe and enjoyable ride. In this article, we’ll guide you through the six easy steps to assemble a skateboard from start to finish. So, grab your tools and let’s get started!

Credit: www.skatewarehouse.co.uk
Understanding The Components Of A Skateboard
Skateboarding is a popular sport that challenges your balance and coordination. And if you’re a beginner, assembling a skateboard can be overwhelming. That’s why we have prepared a step-by-step guide on how to assemble a skateboard, starting with understanding the components of a skateboard.
This guide is perfect for novice riders who want to set up the skateboard themselves.
Deck
The deck is the flat board part of the skateboard. It is the most critical component that determines your riding style.
- Width: skateboard decks range from 7. 5 inches to 8. 5 inches in width. Choose a board that matches your shoe size.
- Length: the standard length of a skateboard deck is 31 inches. However, longer decks are suitable for cruising around.
- Concave: this is the curve of the skateboard deck from side to side. High and steep concaves are excellent for tricks, while low concaves are suitable for cruising.
Trucks
Skateboard trucks are the metal t-shaped component that attaches to the deck. It consists of several parts, including axles, kingpins and bushings. Trucks are responsible for steering and turning the skateboard.
- Width: make sure the trucks match the width of the skateboard deck.
- Height: the height of the truck affects how high the board sits from the ground. Low trucks provide more stability and are great for cruising, while high trucks are great for tricks and flips.
Wheels
Wheels are circular urethane components that attach to the axles of the skateboard trucks. Wheels determine the board’s speed and smoothness of the ride.
- Durometer: this measures the hardness of the wheel. Harder wheels are best for skating on smooth surfaces like skate parks, while softer wheels are great for cruising.
- Size: wheels vary from 49mm to 60mm. Larger wheels are best for cruising, while smaller wheels are better for tricks and flips.
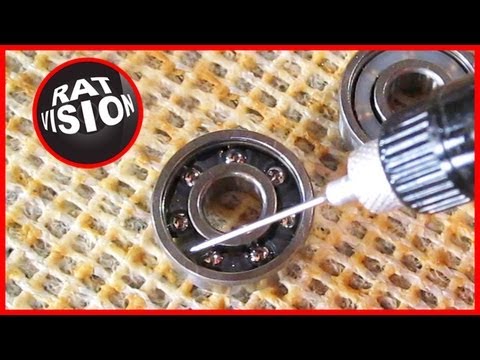
Bearings
Skateboard bearings fit inside the wheels and are responsible for making the wheels spin. Bearings are rated on the abec scale from 1 to 13. The higher the rating, the smoother and faster the bearings will spin.
Hardware
Hardware is the small components that attach the skateboard trucks to the deck. It consists of eight bolts and nuts. They come in different lengths, but the standard size is 1 inch. When purchasing hardware, make sure it matches the width of the deck.
That’s everything you need to know about the components of a skateboard. With this knowledge, you can now confidently choose the right components to assemble your skateboard. Remember, always wear protective gear like helmets, knee and elbow pads, and be safe while skating.
Happy riding!
Things You’Ll Need To Assemble The Deck
Skateboarding is a thrilling and exciting activity that can be enjoyed by people of all ages. For beginners, buying a complete skateboard is an easy way to get started, but assembling your skateboard can be a fun and rewarding experience.
In this guide, we’ll go over the things you’ll need to assemble the deck so that you can enjoy cruising or performing tricks around town.
Skateboard Deck
The skateboard deck is the most crucial component of your skateboard as it forms its foundation. A skateboard deck is typically made of wood or composite materials.
- Size: skateboard decks range from 7. 5 to 8. 5 inches in width. Choose a size that is appropriate for your feet, skill level, and intended use.
- Style: skateboard decks come in various shapes, such as popsicle, cruiser, and longboard. Decide on your preferred riding style before choosing a style.
- Brand: stick to reputable, high-quality brands like element, plan b, and zero.
Trucks (2)
The trucks are the metal components that attach the wheels to the skateboard deck. They are essential to your skateboard’s stability and control.
- Size: truck size is directly proportional to skate deck size; choose size 7. 75″ trucks for a 7. 5″ deck, 8. 0″ trucks for an 8. 0″ deck, and so on.
- Style: choose between traditional kingpin (tkp) or reverse kingpin (rkp) trucks based on your riding style.
- Brand: quality brands such as independent, thunder, and venture will last longer and provide better performance.
Hardware (8 Bolts And Nuts)
Skateboard hardware, typically composed of 8 bolts and nuts, holds your skateboard trucks securely to the deck. Choose your hardware based on the color and brand that best complements your skateboard.
Screwdriver
A screwdriver is necessary for tightening your bolts and nuts, so make sure you have one handy. A phillips head screwdriver is the most commonly used type for skateboard assembly.
Grip Tape
Grip tape is a rough, sandpaper-like material that covers the top of the skateboard deck to provide traction between your feet and the skateboard.
- Size: grip tape is usually sold in sheets that you’ll need to trim to fit your deck size.
- Color: choose the color that best suits your skateboard.
- Brand: once again, stick to well-known brands such as mob, jessup, or black magic.
Assembling a skateboard requires the right components and tools. High-quality brands and proper fitting components will improve your riding experience and ensure your skateboard lasts longer. With these six easy steps, you’ll be able to assemble your skateboard confidently and take to the streets.
Things You’Ll Need To Install The Trucks
Assemble a skateboard may seem daunting at first, but once you know the basics, it’s a breeze. In this blog post, we’ll guide you through the six easy steps to put your skateboard together, with a focus on the things you’ll need to install the trucks.
Skateboard Deck (Already Attached)
The skateboard deck is the flat, wooden part of the skateboard that you stand on. Before installing the trucks, make sure your skateboard deck is attached securely. You can check by testing both ends of the deck to ensure that it doesn’t bend or move around too much.
Now, let’s move on to the next important component.
Trucks (Already Attached)
Trucks are the metal t-shaped parts of your skateboard that hold the wheels. The trucks are usually already attached to the deck when you purchase it, but if not, you will need to attach them using screws and a wrench.
If the trucks are pre-attached, make sure that they are tightly fastened to the skateboard deck before proceeding to the next step.
Hardware (Already Attached)
Hardware refers to nuts and bolts that hold the skateboard together. This includes the bolts that secure the trucks to the skateboard deck and the nuts that go onto those bolts. They are usually included with the trucks, so make sure they are accounted for before discarding any packaging.
The hardware should be already attached to the trucks, but you should still check to ensure that everything is tightened properly.
Skate Tool
A skate tool is a must-have when it comes to installing trucks and wheels. It’s a small wrench-like tool with a few different socket sizes, which will help you to tighten and loosen the nuts and bolts on your skateboard.
You can purchase a skate tool online or from any skate shop.
Steps To Install The Trucks
Now that we have everything we need, let’s get started!
- Turn the skateboard upside down to access the bottom of the deck.
- Insert the truck into the four holes on the bottom of the deck. The kingpin should be facing inward, towards the center of the deck.
- Place the nuts onto the bolts and screw them into the truck holes. Tighten them until they’re secure, but make sure not to overtighten.
- Flip the skateboard back over and repeat the process for the other end of the deck.
- Adjust the tightness of the trucks to your liking using the skate tool.
- Finally, test your skateboard to make sure everything is secure and the trucks turn smoothly.
That’s it! You’ve successfully assembled your skateboard and are ready to hit the streets. Remember to always practice caution and wear protective gear while skateboarding. Happy skating!
Things You’Ll Need To Mount The Wheels
Skateboarding is an incredibly fun and exciting sport, but it can be frustrating if you don’t have the proper know-how to assemble your skateboard. In this blog post, we’ll guide you through the process of assembling a skateboard in six easy steps.
This section will focus on the equipment you’ll need to mount the wheels.
Bearings (8)
Bearings are an essential component that allows your wheels to spin smoothly on your skateboard.
- You will need eight bearings for your skateboard, two for each wheel
- Bearings come in different types, but abec-7 bearings are a good choice for beginners
- Make sure to clean your bearings before installing them on your skateboard
Wheels (4)
Wheels are an essential component of your skateboard. They come in different sizes and hardness levels and can affect how smooth your ride is.
- You need four wheels for your skateboard, one for each truck
- Skateboard wheels come in different sizes and hardness levels
- Softer wheels offer more grip but are slower, while harder wheels are faster but provide less grip
- Make sure the wheels match the size of your bearings
Skate Tool
A skate tool is a handy multi-purpose tool specially designed to assemble and adjust skateboard components.
- You’ll need a skate tool to assemble your skateboard
- A skate tool typically includes a screwdriver, allen wrench, and sockets for your skateboard hardware
- Using a skate tool will make the process of assembling your skateboard easier and quicker
By following these guidelines, you’ll be able to assemble your skateboard with ease. Knowing what equipment you need is essential, so make sure you have all the necessary gear before starting. With your bearings, wheels, and skate tool in hand, you’re ready to move on to the next step in assembling your skateboard.
Things You’Ll Need To Apply Grip Tape
Assembling a skateboard may seem like a daunting task, but with the right tools and some guidance, it can be an easy and enjoyable process. Grip tape is an essential component in a skateboard, as it provides traction and grip for the rider’s feet.
To apply grip tape to your skateboard, you will need the following items.
Skateboard Deck (Already Assembled)
Before you start applying grip tape to your skateboard, you need to ensure that your skateboard deck is already assembled. Make sure that the trucks, bearings, and wheels are securely attached to the deck.
Grip Tape
Grip tape is a sandpaper-like material that provides traction and grip for the rider. You can easily purchase it from a skateboard shop or online. Make sure that you get the right size of grip tape for your skateboard deck.
Razor Blade
You will need a sharp razor blade to cut the grip tape to fit the shape of your skateboard deck. It is important to have a sharp blade to ensure a clean and precise cut.
Squeegee
A squeegee is a useful tool for removing air bubbles and ensuring that the grip tape is securely applied to the deck. You can use any flat and rigid object as a substitute for a squeegee.
To apply grip tape to your skateboard, follow these simple steps:
- Clean the skateboard deck: use a cloth to wipe the surface of the deck clean of any dirt or debris.
- Place the grip tape: remove the backing from the grip tape and carefully place it onto the skateboard deck, making sure that it is centered and aligned with the board.
- Cut the grip tape: use a razor blade to trim the excess grip tape around the edges of the deck. Make sure to use a steady hand and a sharp blade for a clean and precise cut.
- Smooth out the grip tape: use a squeegee or flat object to press down firmly on the grip tape, smoothing out any air bubbles and ensuring that the grip tape is securely applied to the deck.
- Cut holes for the trucks: use the razor blade to cut holes in the grip tape where the trucks will be attached to the deck.
- Finishing touches: use a file or sandpaper to smooth out any rough edges or corners on the grip tape.
By following these simple steps, you can easily apply grip tape to your skateboard and enjoy a secure and comfortable ride. Happy skating!
Things You’Ll Need To Tighten The Hardware
Assembling a skateboard can be a fun and rewarding experience. However, it can also be quite challenging if you don’t have the right tools and knowledge. In this blog post, we’ll guide you through the process of assembling a skateboard in six easy steps.
In this section, we’ll focus on the tools you’ll need to tighten the hardware. So, let’s get started with our first subheading.
Skateboard Deck (Already Assembled)
- Make sure that the deck is facing upwards.
- Hold the skateboard steady with your feet or ask someone for help.
- Check to ensure that the skateboard deck has pre-drilled holes.
Trucks (Already Assembled)
- Make sure that the trucks are facing downwards.
- Place the trucks on the skateboard deck where the pre-drilled holes are.
- Ensure that the trucks are aligned with the edges of the skateboard deck.
- Insert the bolts into the pre-drilled holes.
Hardware (Already Attached)
- Make sure that the nuts and bolts are tightened securely.
- Use a skate tool or a wrench to ensure they’re tightened properly.
- Check the nuts and bolts regularly to ensure they remain tight.
Skate Tool
- Use a skate tool to ensure the nuts and bolts are tightened securely.
- Skate tools often have multiple sockets and allen keys to fit different sizes of nuts and bolts.
- Check the tool’s instructions to know which socket or key to use.
By following these simple steps, you will have everything you need to assemble your skateboard with ease. Do remember to keep the nuts and bolts tightened and checked regularly, to ensure your skateboard is safe and secure to ride. Happy skating!
Things To Check Before Riding Your Skateboard
Skateboarding is all about freedom and excitement, but before you hit the pavement, it’s imperative to make sure your board is in tip-top shape.
Tightness Of The Trucks
The trucks are the metal parts that attach the wheels to the deck. You should make sure they are tightened enough to give you stability while you ride, but not too tight that you can’t turn.
- Use a skate tool or wrench to adjust the tightness of the kingpin nut until the trucks feel firm but are still responsive.
- Make sure both trucks are tightened evenly to avoid any wobbling while you ride.
- Test the tightness by gently leaning to each side on your board.
Tightness Of The Hardware
The hardware refers to the nuts and bolts that attach the trucks to the deck. If they are too loose, your board may wobble or even fall apart while you ride.
- Use a skate tool or wrench to make sure all hardware is tightened evenly.
- The hardware should be tight enough so that the board doesn’t wobble, but not too tight that the wheels have trouble spinning.
Condition Of The Wheels And Bearings
The wheels are what allow your skateboard to move, and the bearings are the metal rings that sit inside the wheels and allow them to spin. If your wheels or bearings are damaged or dirty, it can significantly affect your ride.
- Look at the wheels and check for cracks, flat spots, or any significant damage. If they are damaged, replace them.
- Remove the bearings and clean them using a bearing cleaner or rubbing alcohol. Dry them thoroughly and use bearing lubricant to keep them spinning smoothly.
- Spin the wheels to make sure they spin freely and don’t wobble.
By following these simple tips, you can ensure that your skateboard is in excellent condition, and you can ride safely and with confidence. So double-check everything before hitting the pavement and enjoy the ride!
How To Assemble A Skateboard | Skateboarding Tips
Conclusion
Assembling a skateboard may seem like a daunting task, especially for beginners. But with these six easy steps, you can easily put together your own skateboard and hit the streets in no time. Remember to have all the necessary tools, take your time and follow the instructions carefully.
Don’t hesitate to seek help or advice from experts if you encounter any problems. Whether you’re a seasoned rider or just starting out, assembling your own skateboard can be an enjoyable and rewarding experience. So, go ahead and give it a try.
With the right tools, skills, and knowledge, you can assemble your skateboard with ease and get ready for an exciting ride! Happy skating!